Back in the old days, when pint only cost £3 ( unless you wanted Guinness ) every shot was worked on separately as an individual piece of work.
That meant a separate lighting scene for each shot, and something like re-rendering a project at a different resolution required every individual scene to be opened one by one, updated and sent to the farm.
The future arrived long ago, and now ( along with flying cars ), multishot lighting is so normal that its barely worth writing about.
A list of shots
So the most obvious requirement is a list of shots.
If you are using Ftrack or Shotgun, then these systems should already contain this data, and it’s just a case of working out the api call to get it out….
But be warned: These databases are typically crazy slow, like wait several seconds – not conducive to a responsive interface.
Having your own mariadb/postgres/whatever database allows you instant data access – but at the cost of setting it up, and needing to constantly sync data from the “real” production tracker.
This has been my approach in the past, but a simpler option is to just have a list of the data.
You can store this list in a spreadsheet node, and the gaffer developers seem to be encouraging this approach ( have a look at the example scene in Help>Examples>Rendering>Multishot ).
Or you can just hard code it into a startup file, which you are going to need anyway for the menu.
ShotPicker Menu
A way to conveniently switch shots is clearly needed, and one approach is to have the shots in a dropdown menu:
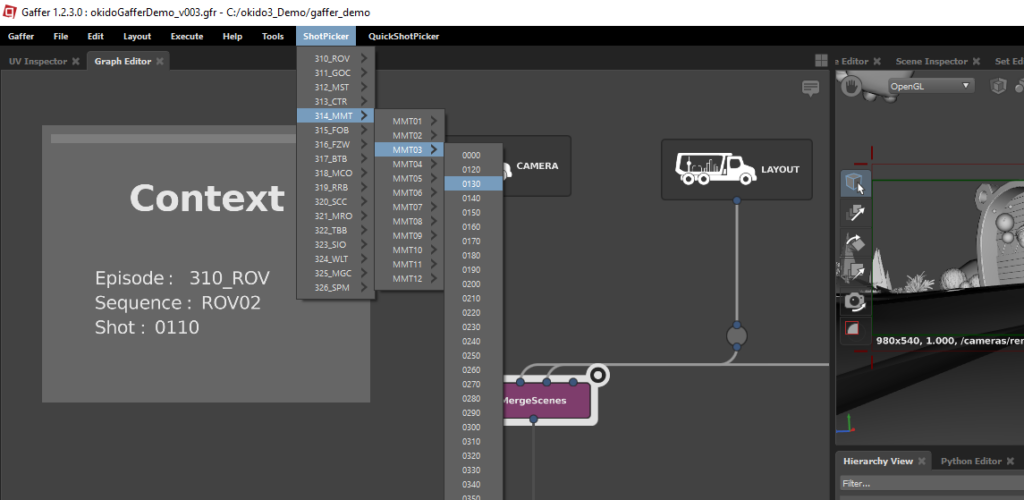
In this case we have multiple episodes, sequences and shots, but in many cases the whole project might only be a few shots and we can go simpler.
Startup script
I will cut to the chase.
Copy this code into a file called whateverYouWant.py and place it in /startup/gui/
import Gaffer
import IECore
import GafferUI
import functools

SHOT_LIST = {}
SHOT_LIST["SH010"] ={"fstart": 1001, "fend":1248}
SHOT_LIST["SH020"] ={"fstart": 1001, "fend":1050}
SHOT_LIST["SH030"] ={"fstart": 1001, "fend":1100}
SHOT_LIST["SH040"] ={"fstart": 1001, "fend":1048}
SHOT_LIST["SH050"] ={"fstart": 1001, "fend":1215}

# ensure any global variables exist:
def __add_globals(container, script):
    custom_vars = ["shot"]
    for var in custom_vars:
        if var not in script["variables"]:
            script["variables"].addChild(
                Gaffer.NameValuePlug(var, Gaffer.StringPlug("value", defaultValue="none"), True, var, Gaffer.Plug.Flags.Default | Gaffer.Plug.Flags.Dynamic)
            )
            Gaffer.Metadata.registerValue(script["variables"][var], 'readOnly', True)

application.root()["scripts"].childAddedSignal().connect(__add_globals, scoped=False)

def set_framerange(root, fstart, fend):
    root['frameRange']["start"].setValue(int(fstart))
    root['frameRange']["end"].setValue(int(fend))
    playback = GafferUI.Playback.acquire( root.context() )
    playback.setFrameRange(int(fstart), int(fend))

def shot_selection(menu, shot):
    scriptWindow = menu.ancestor( GafferUI.ScriptWindow )
    script = scriptWindow.scriptNode()
    script['variables']['shot']['value'].setValue(shot)
    set_framerange(script, SHOT_LIST[shot]["fstart"], SHOT_LIST[shot]["fend"])

def shotMenu(menu):
    subMenuDefinition = IECore.MenuDefinition()
    for shot in SHOT_LIST.keys():
        menuString = "/" + shot
        subMenuDefinition.append(menuString, {"command": functools.partial(shot_selection, shot=shot)})
    return subMenuDefinition

# create menu
m = GafferUI.ScriptWindow.menuDefinition(application)
m.append("/ShotPicker", {"subMenu": shotMenu})
I won’t explain the code, I think it’s mostly easy to follow what it’s doing.
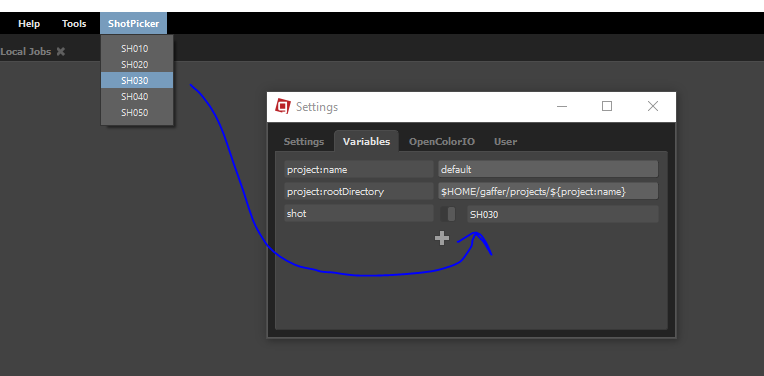
You should end up with a simple shot picker, and when you pick a shot, the frame range gets updated to whatever has been written into the hard coded list.
The other thing that happens is the “shot” variable gets updated to match the selected shot.
Context backdrop
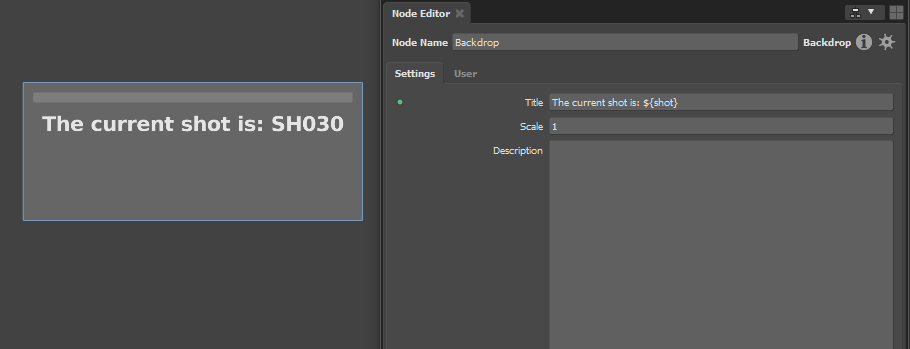
The current selected shot is essentially invisible, and a quick way to solve that is to have a backdrop node which tells you what it is:
Loaders and output paths
So you ultimately you might want a system by which your approved camera/animation/whatever version gets loaded automatically by a relevant loader node.
This can be achieved via a sceneReader node with a python expression driving the path.
A much simpler approach is to just have a pre-defined location on disk for each asset type, and then use the shot variable in a scene reader path to load the asset for the current shot.
for example you could have your shot cameras on disk:
disk/project/SH010/cameras/approved_camera.abc
disk/project/SH020/cameras/approved_camera.abc
disk/project/SH030/cameras/approved_camera.abc
disk/project/SH040/cameras/approved_camera.abc
now your “camera loader” can simply be a scene reader with:
disk/project/${shot}/cameras/approved_camera.abcin the path. simple.